
WallySci's ECG sensor is used to capture electrical signals originating from the heart via electrodes. The signal through the electrodes is filtered and amplified which is then presented in the form of Analog Output. An ECG sensor can be used for prototyping a portable heart monitoring device.
Disclaimer: Not for clinical use. Only for educational purposes
What is Electrocardiography?
One of the important parameters that are measured by a doctor to know the health of a person is cardiac muscle activity. Electrocardiography is one of the ways of measuring these activities in the form of electrical signals using electrodes placed on the skin. These electrodes measure the change in voltage that is a consequence of cardiac muscle depolarization followed by repolarization during each cardiac cycle (heartbeat). These signals are then represented in the form of a graph known as Electrocardiogram (ECG). After that, by analyzing these signals, one can determine the functioning and the condition of the heart.
In a heart clinic, 12 leads ECG machine is used in which the leads are placed near the wrist, foot, and across the heart above the chest. With the advancement in sensor technology and the need to monitor ECG at home, ECG machines have been miniaturized. One can get good quality ECG signals from 3 lead systems and miniature electronics. Signals received are further filtered both electronically and at the software level.
Understanding the ECG signal
In general terms, let's look at what an ECG is representing and how we're able to sense it. The ECG is separated into two basic Intervals, the PR Interval and the QT Interval, described below.
Note: All information comes from the Waves and Intervals section of the ECG Wikipedia page.

PQRST complex of the ECG signal (Credit Wikipedia.org)

Diagram of the heart. (Credit: Wikipedia.org)
PR Interval
The PR interval is the initial wave generated by an electrical impulse traveling from the right atrium to the left. The right atrium is the first chamber to see an electrical impulse. This electrical impulse causes the chambers to "depolarize". This forces it to contract and drain deoxygenated blood from both the Superior and Inferior vena cava into the right ventricle. As the electrical impulse travels across the top of the heart, it then triggers the left atrium to contract. The left atrium is responsible for receiving newly oxygenated blood from the lungs into the left ventricle via the left and right pulmonary veins. The pulmonary veins are red in the diagram because they are carrying oxygenated blood. They are still called veins because veins carry blood towards the heart. Science!
QT Interval
The QT Interval is where things get really interesting. The QRS is a complex process that generates the signature "beep" in cardiac monitors. During QRS, both ventricles begin to pump. The right ventricle begins to pump deoxygenated blood into the lungs through the left and right pulmonary arteries. The pulmonary arteries are blue in the diagram because they are carrying deoxygenated blood. They are still called arteries because arteries carry blood away from the heart. Science, Again! The left ventricle is also beginning to pump freshly oxygenated blood through the aorta and into the rest of the body. After the initial contraction comes the ST segment. The ST segment is fairly quiet electrically as it is the time where the ventricals are waiting to be "re-polarized." Finally the T wave becomes present to actively "re-polarize", or relax the ventricles. This relaxation phase resets the ventricles to be filled again by the atriums.
Heartbeat with corresponding ECG Signals (Credit: Wikipedia.org)
These signals can further be transmitted to other devices via Bluetooth. The application can be developed using this data at the receiving device. Now it is up to the user what type of application can run with this type of data.
Project Aim
In this experiment, we will learn how to capture the ECG signals, visualize it and process it.
Material Required

WallySci E3K DCPU

WallySci E3K ECG Sensor

Electrode cable

Battery
Connection Diagram

Connections between DCPU and ECG sensor
Procedure
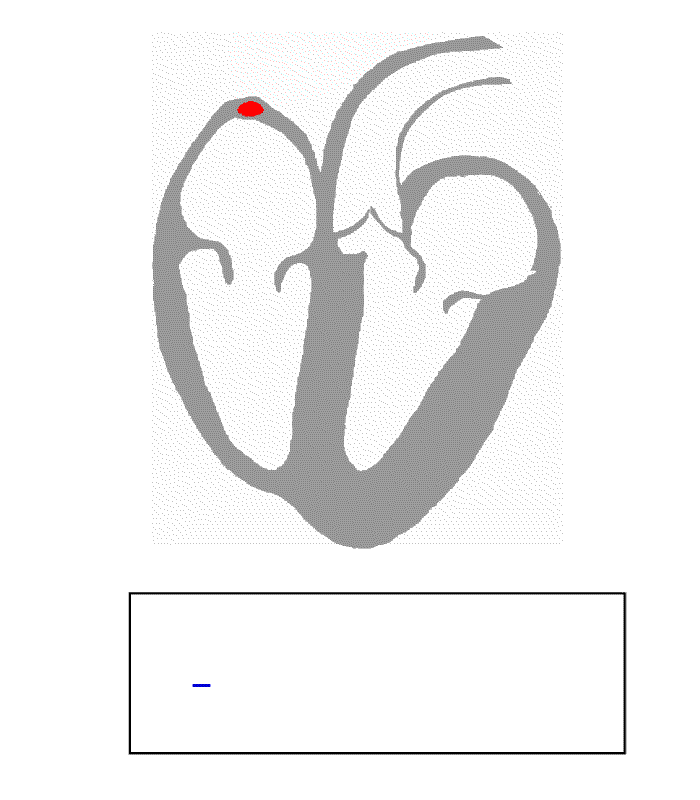
The first step is to capture the ECG signals. This will be achieved by connecting the ECG sensor with the DCPU which have 6 Analog input channels. The reference electrode will be placed on the left-leg ankle or at the back of the left-hand palm ( or somewhere close to the bone with least muscle activity). The other two electrodes will be placed on the wrist as shown in the following figure. (See download section for the codes)

Placement of the electrode (red dot is the reference electrode) (credit: Wikipedia.com)

Sample EMG Data as seen on Arduino IDE Serial Monitor
Downloads
Codes will be added soon
Comments